
Prototyping LiveOps Events with a Designer-First Framework
How can we design live events for hybrid-casual games in a structured way?

Welcome to my new blog post!
Today, we will discuss how to prototype different types of live events using a framework I’ve prepared.
The live event prototyping framework is a framework for hybrid-casual games that enables even seemingly different events to use the same configuration infrastructure, while helping standardize communication between product and development teams.
Before continuing with the article, you can try it here:
Live Event Prototyping Framework by Burak Ökten for Hybrid Casual Games
As a game designer, I’ve often experienced that some of the biggest challenges in event design and implementation are explaining how an event should work to developers, while also trying to build economy models across excel files that keep growing and becoming harder to manage. For this reason, I specifically decided to develop it with a designer-first approach.
I derived this framework from another economy framework I worked on last year. You can read more about that topic in my article, Why LiveOps Feels Unpredictable for Game Designers. While it is your responsibility to check the accuracy of the results produced by the framework, my goal here is to help product teams in particular with the following:
Quickly prototype any hybrid-casual event that comes to mind,
Approximately simulate your existing game economy when needed,
Take a quick look at how schedule changes would affect your existing game economy,
Prevent developers from struggling with different event templates, and
Help you get a quick start if you want to create your own LiveOps solutions, whether remote or client-side.
To be honest, the number of studios trying to use their own LiveOps methods is not insignificant. For this reason, I believe it will be quite useful for you, especially if you are using solutions such as Firebase Remote Config.
Although this framework does not claim to be a production-ready solution, I think it may inspire different tools you may want to develop in the future.
Now we can return to the main topic of the article. Although the framework’s website already provides access to its documentation and sample events, I thought it would be useful to walk through how to add an event step by step. Along the way, we’ll also cover some of the other features worth highlighting.
Here’s a quick look at the outline of the article:
Introduction, in this section, we briefly discuss the core features of the framework,
Event Prototyping, in this section, we prepare a Season Pass event.
Then, let’s begin!
Introduction
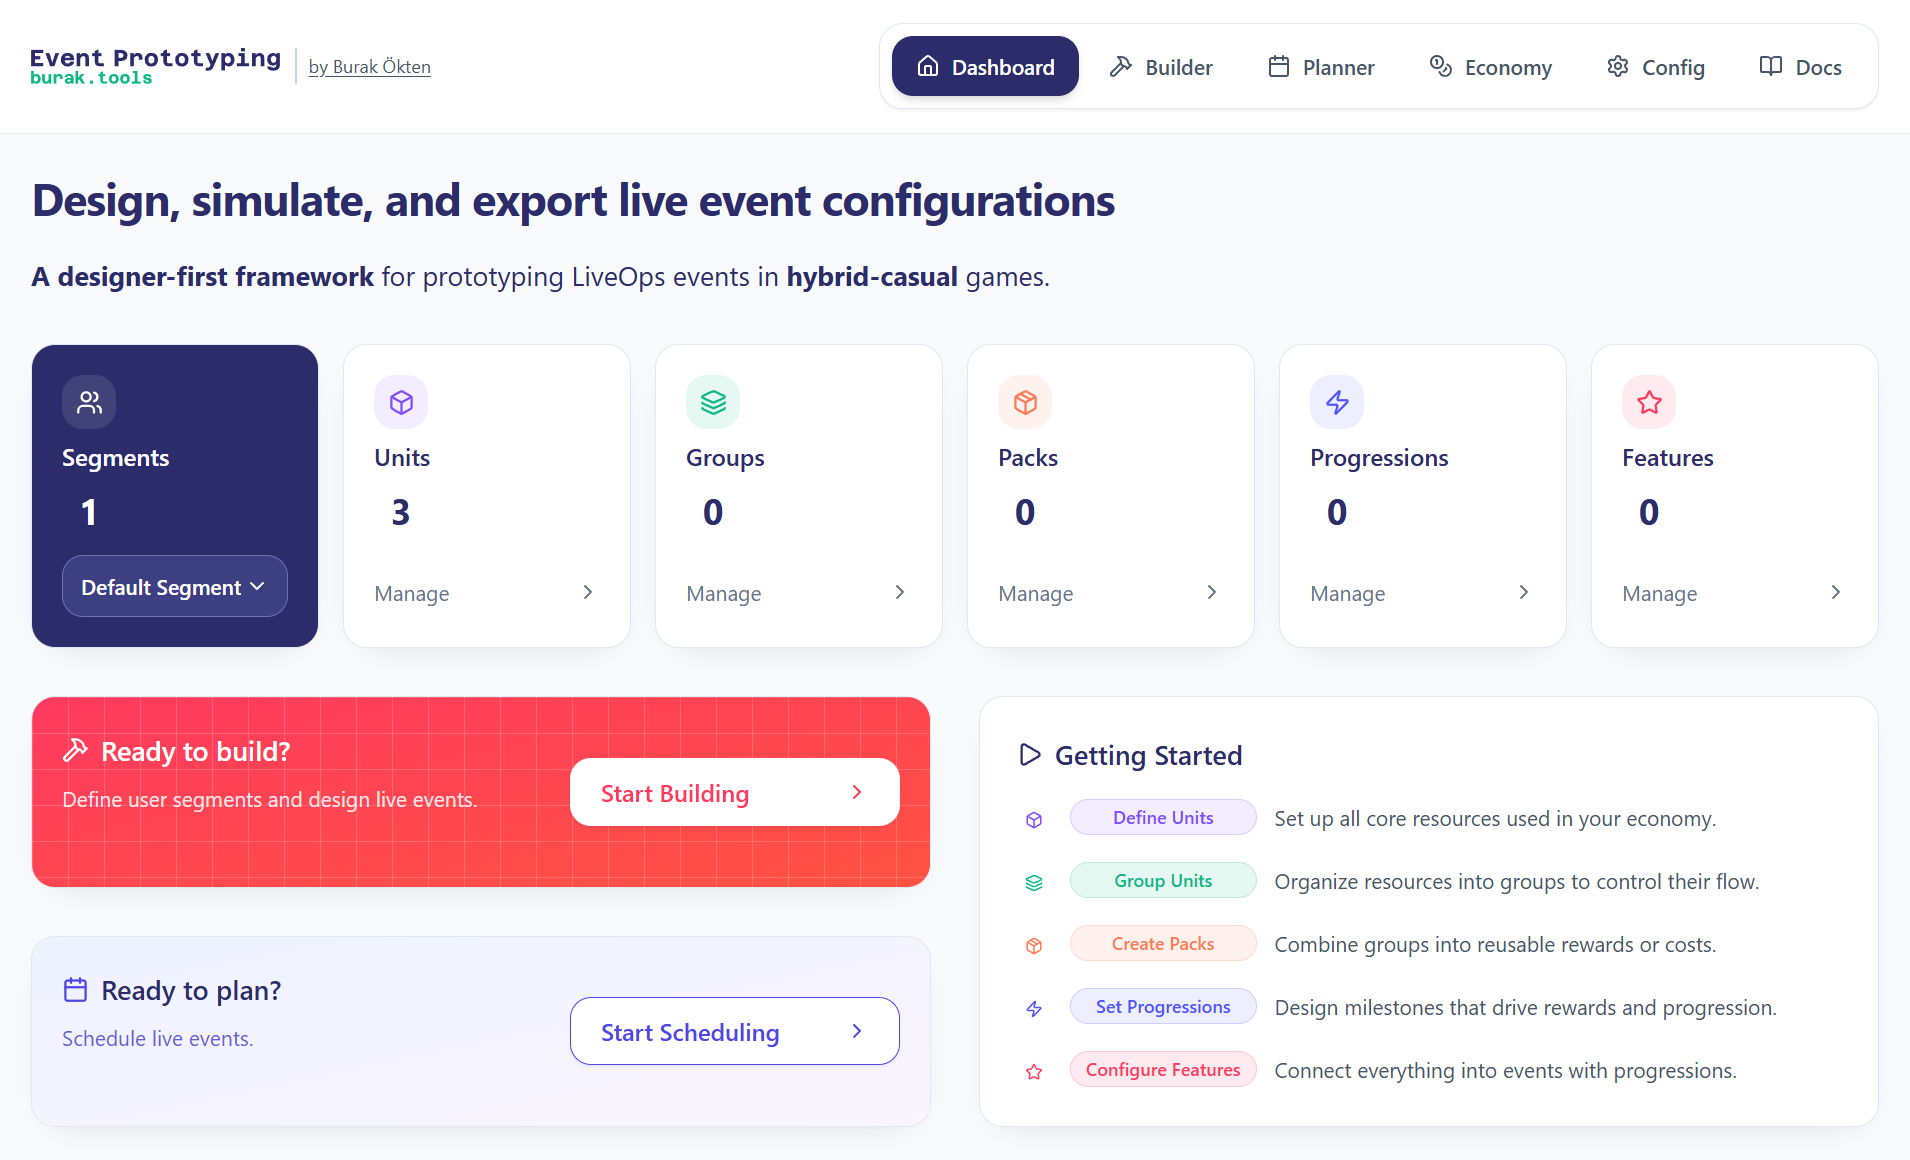
The live event prototyping framework consists of 4 main sections:
Builder - in this section, we design events,
Planner - in this section, we schedule the events,
Economy - in this section, we run an economy simulation of the events we placed on the calendar, and
Configurations - in this section, we can either export the configuration of the events we designed, or import previously exported events and continue working on them.
Builder
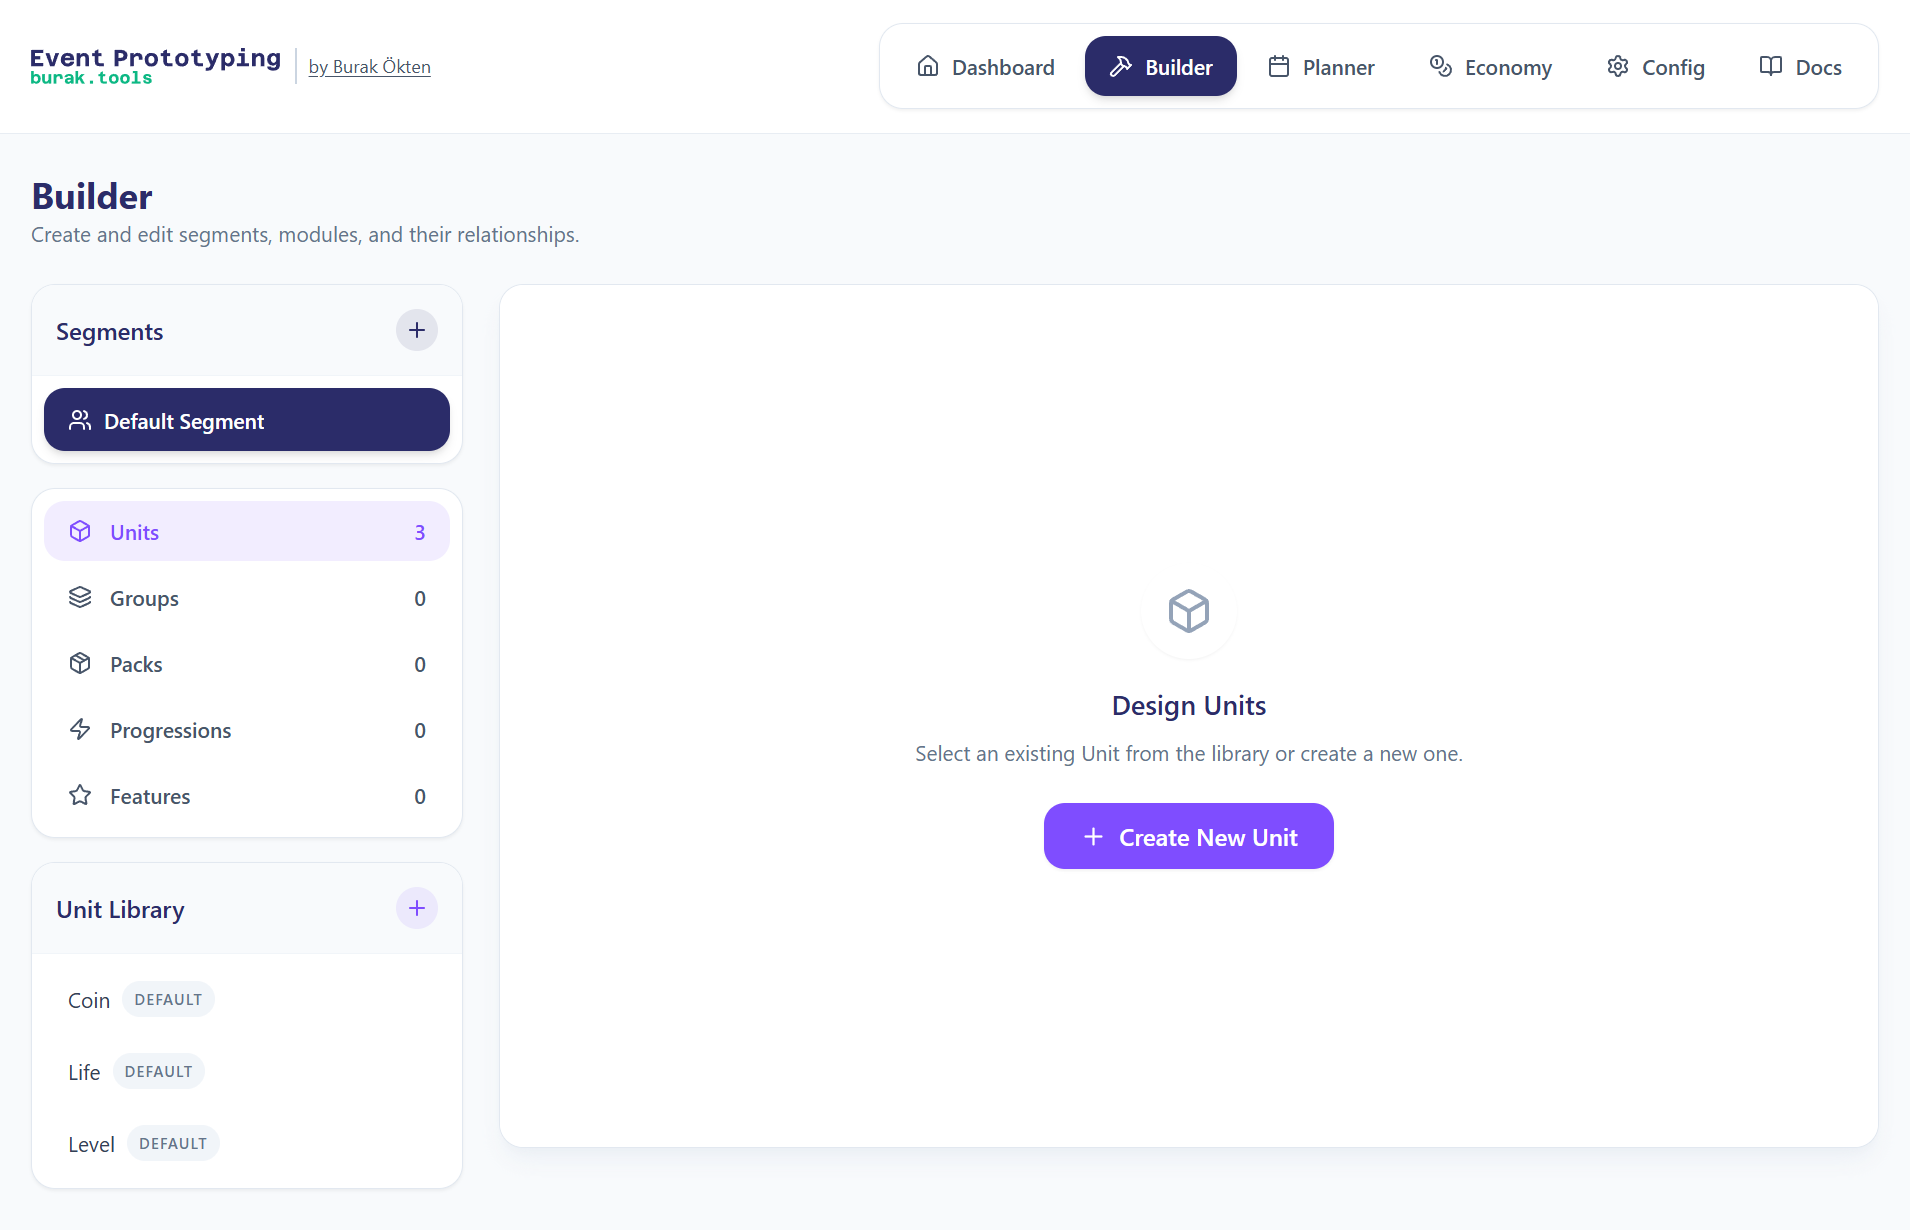
The Builder page includes the Units, Groups, Packs, Progressions, and Features modules that we will use in event design, as well as the Segment module that covers all of them.
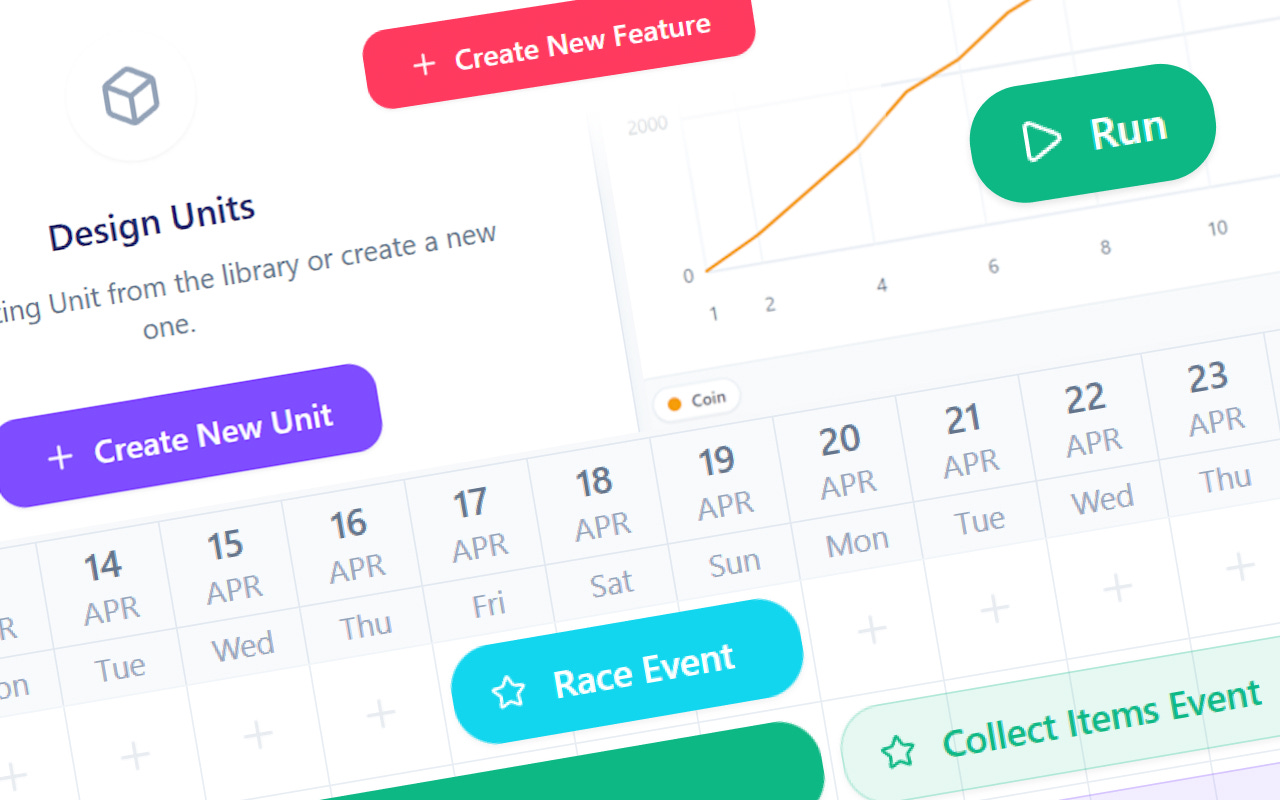
To design an event, you first need to create the relevant Units such as coins, lives, rewarded ads, and so on. These Units are then grouped in the Group module so they can be used together, and those groups are assigned to Packs so they can be used as rewards or offers. Next, Progressions define how rewards are earned, and these progressions are assigned to Features to activate event-specific functionality. Each completed Feature item represents a designed event.
We’ll explore these processes in practice in the Event Prototyping section.
Planner
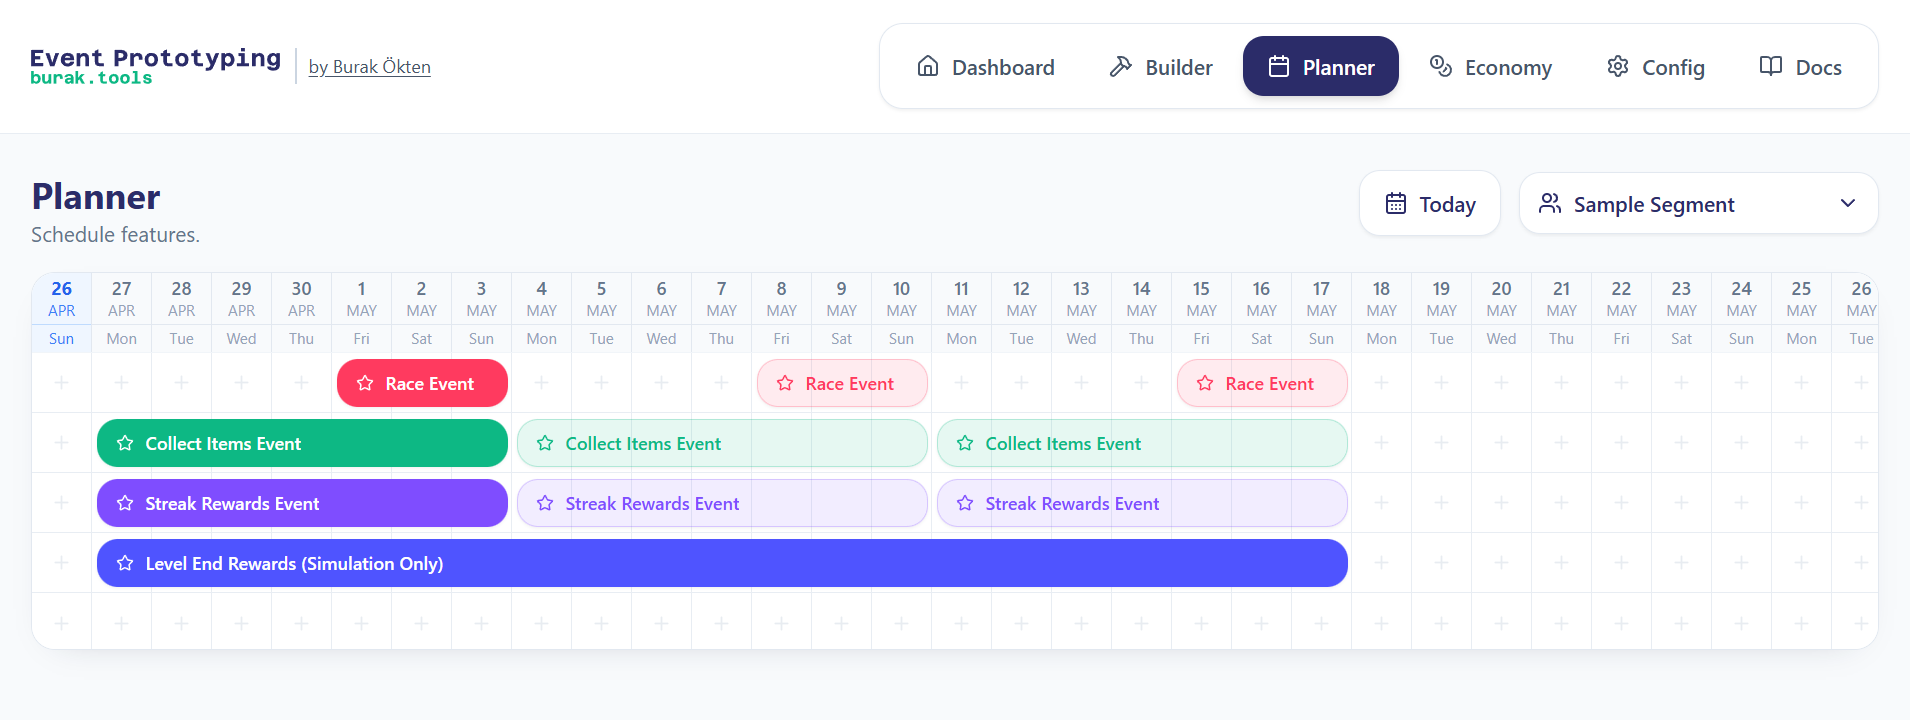
Features prepared in Builder page can be added to the calendar in Planner page on a segment basis. In the calendar, the event duration type and repeat rules can be adjusted according to your requirements.
Economy
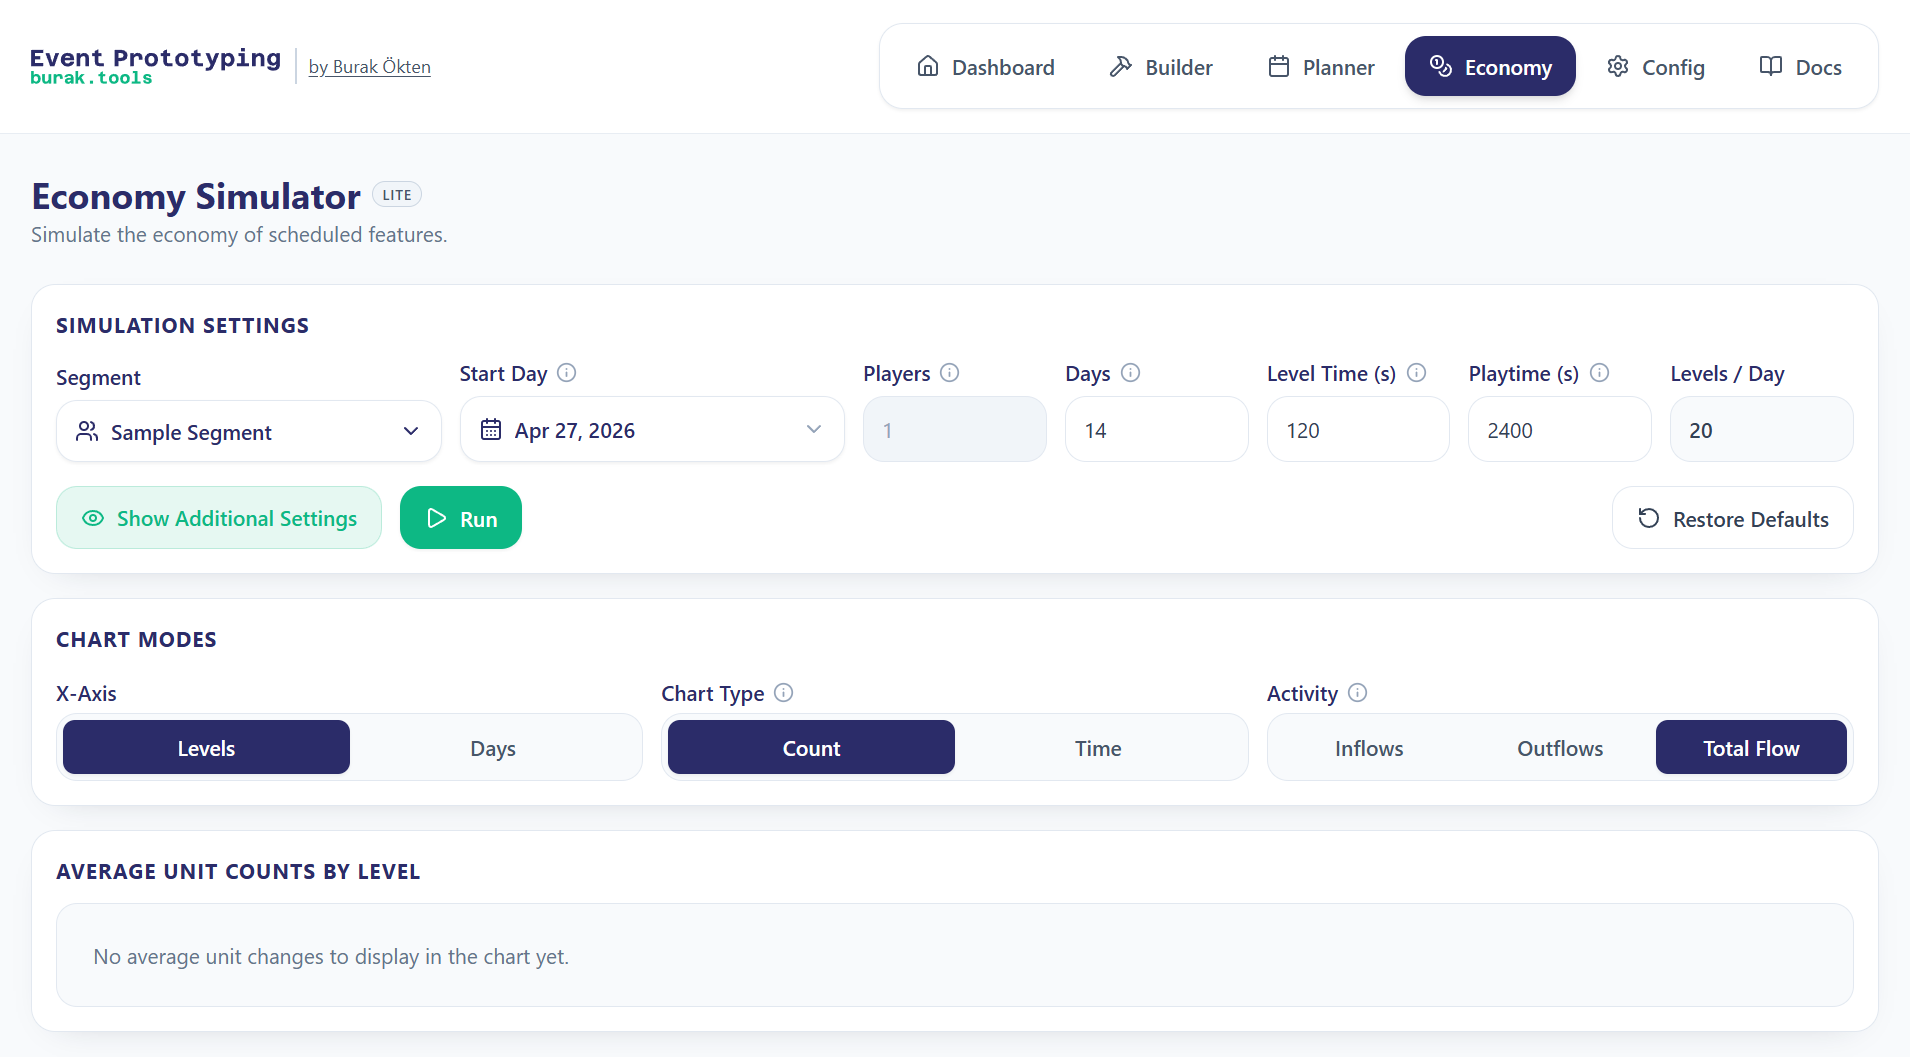
On the Economy page, the events scheduled in Planner can be simulated for the relevant segment. In this way, when needed, the results of similar features with different schedules in different segments can be compared.
Configurations
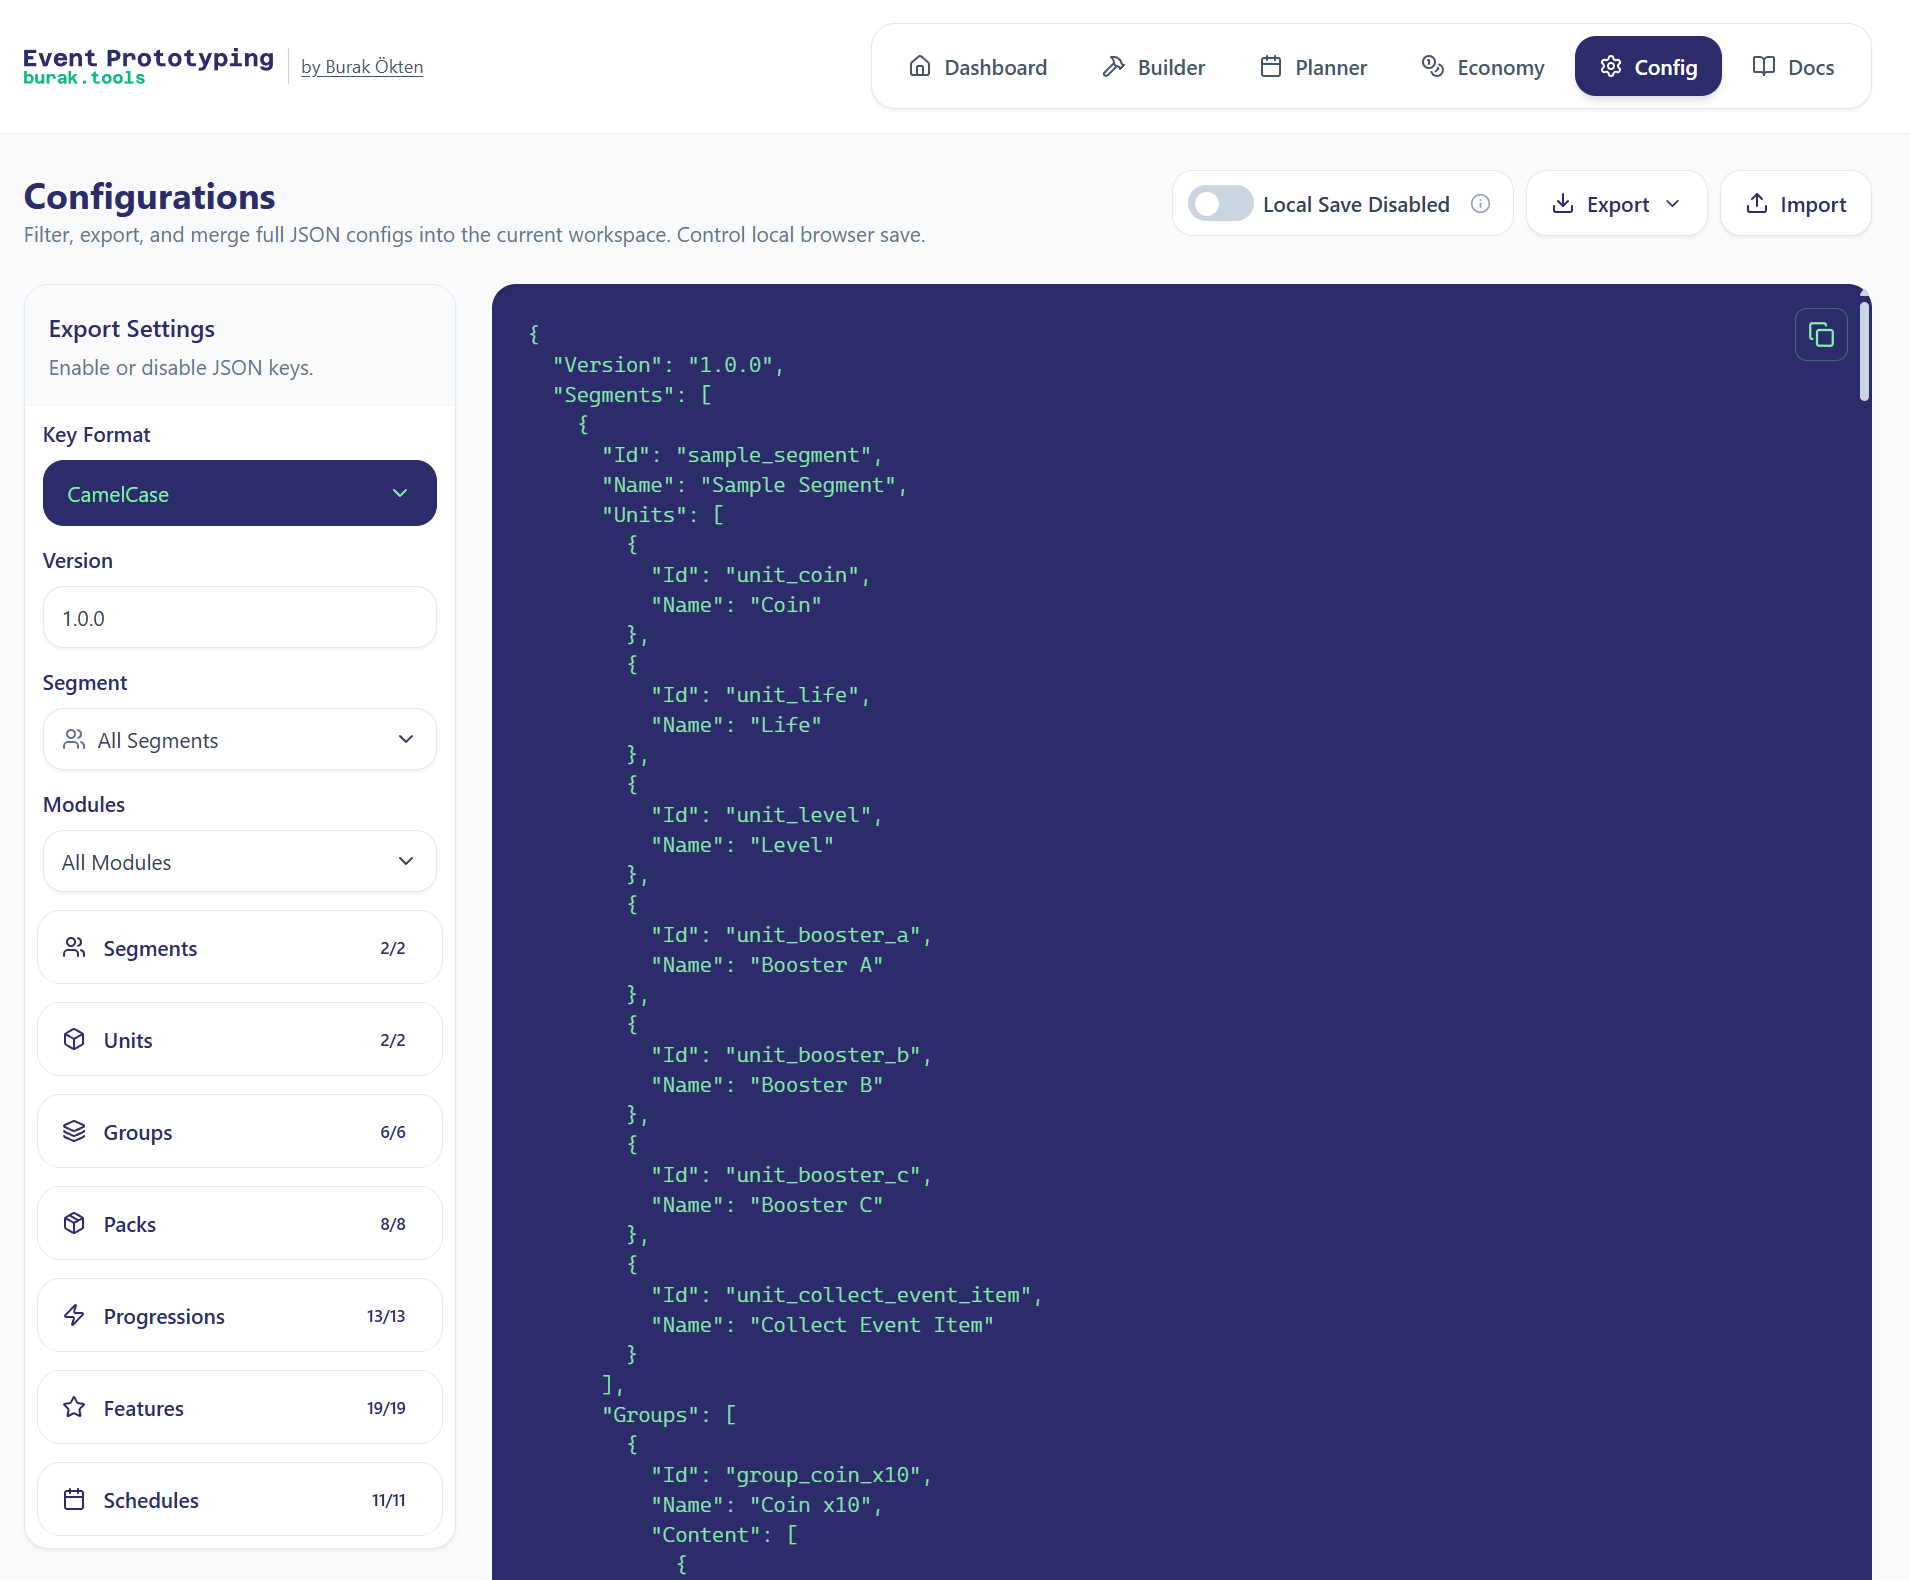
On the Configurations page, the changes on the Builder and Planner pages are previewed at the configuration level in JSON format. If desired, configurations can be exported or imported for later use. To make usage easier, you can use the left menu to filter within the JSON file.
Event Prototyping
In this section, we will discuss step by step how we can prototype an event:
Season Pass Event with 2 tiers: 1 free and 1 premium.
Each value we enter while preparing the configurations will be for sample demonstration purposes. We will not be concerned with making them resemble the configurations of any particular game.
That said, on the framework’s own page, you can find the Streak Rewards, Collect Items, and Race events inside the Sample Segment. I added these as examples as well.
I assume you already know how the core loops of these events work. Therefore, I will not go into those details.
Season Pass Event
In this example, I’ll show how to prototype a Season Pass event.
Designing Units for the Season Pass Event
First, we need to decide on all the units related to this event.
Let’s choose the following units as rewards:
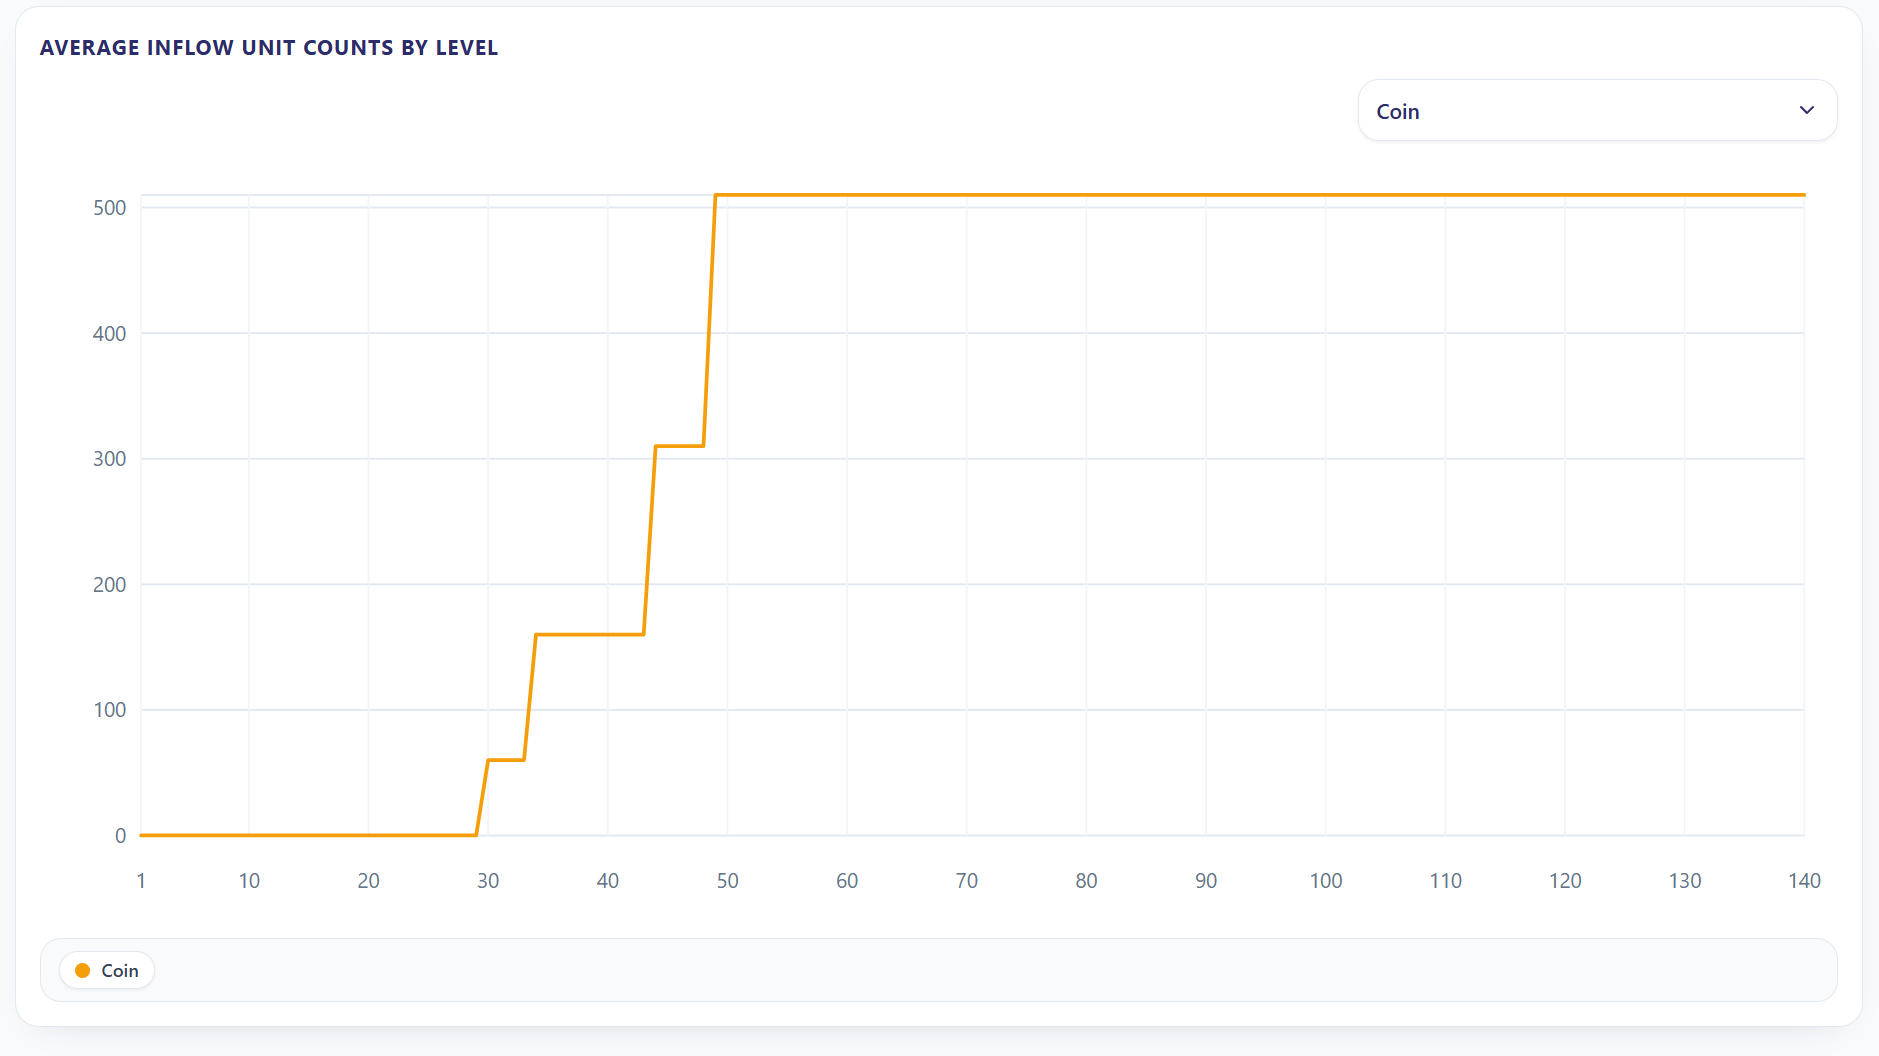
Coin
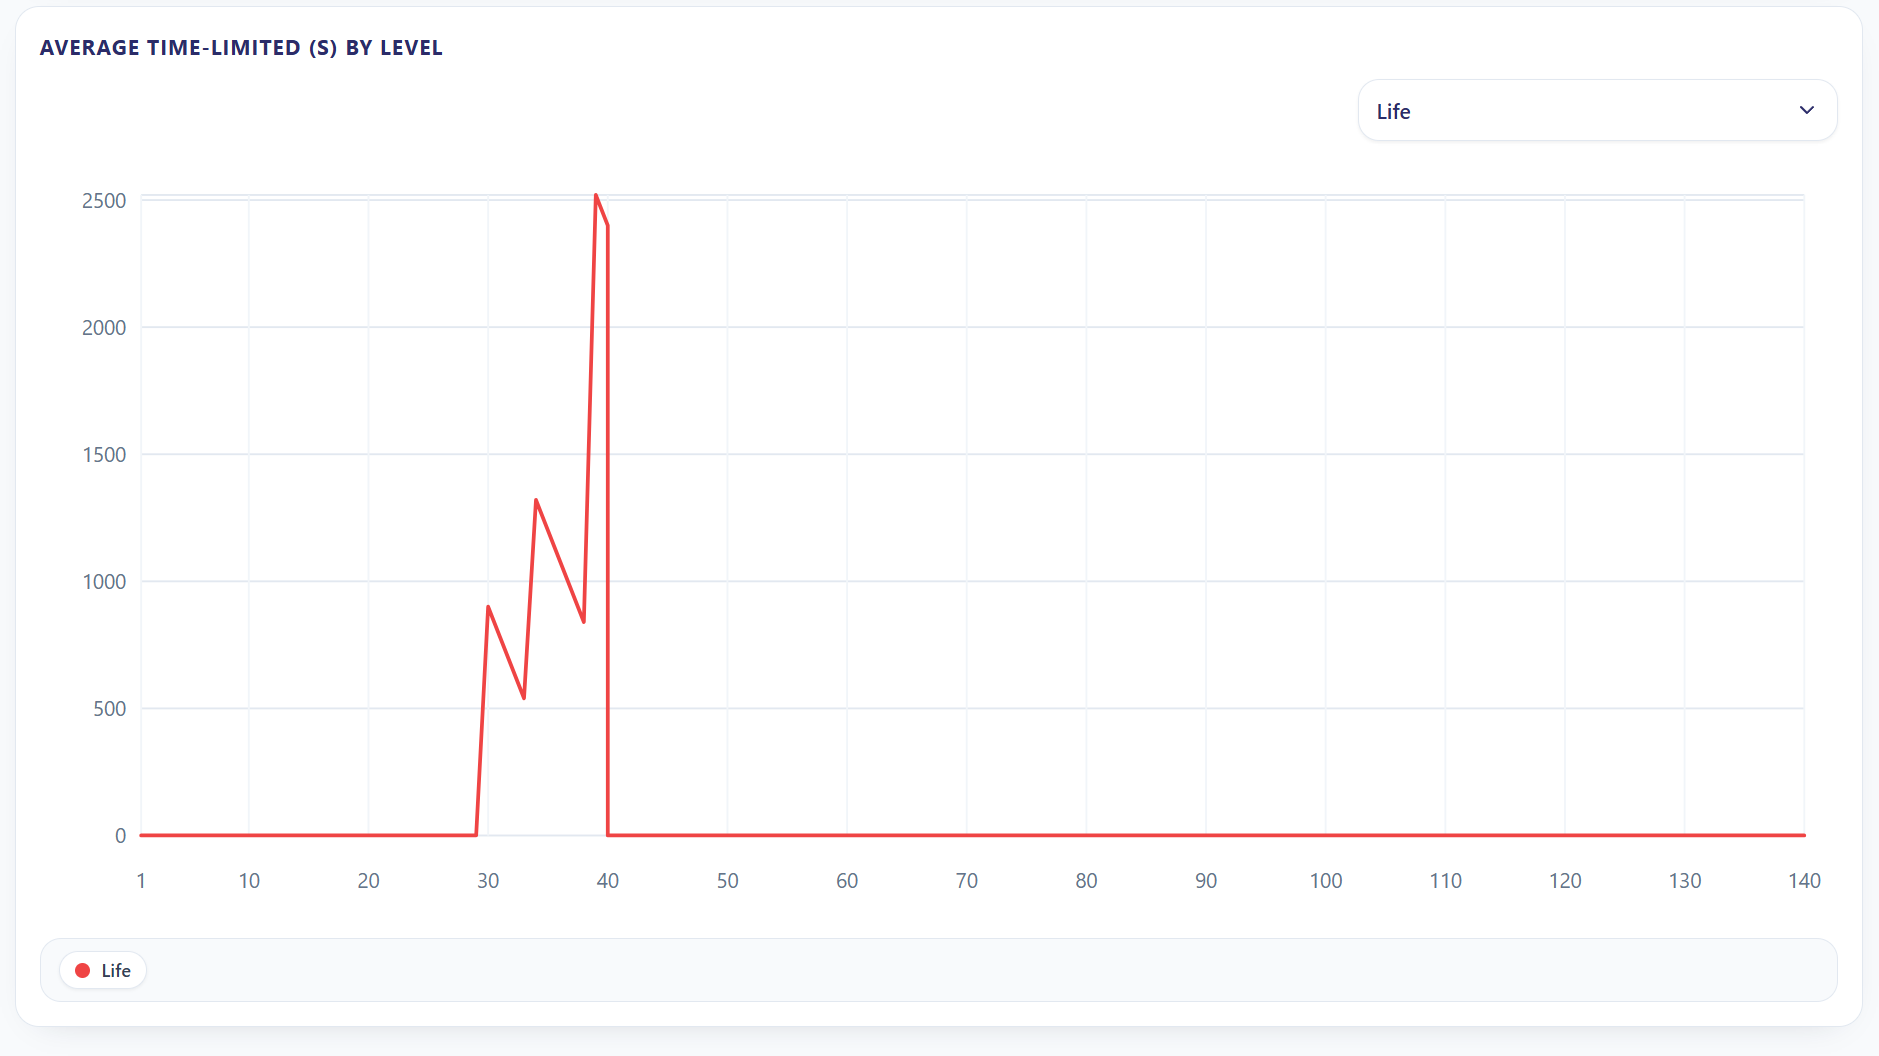
Life
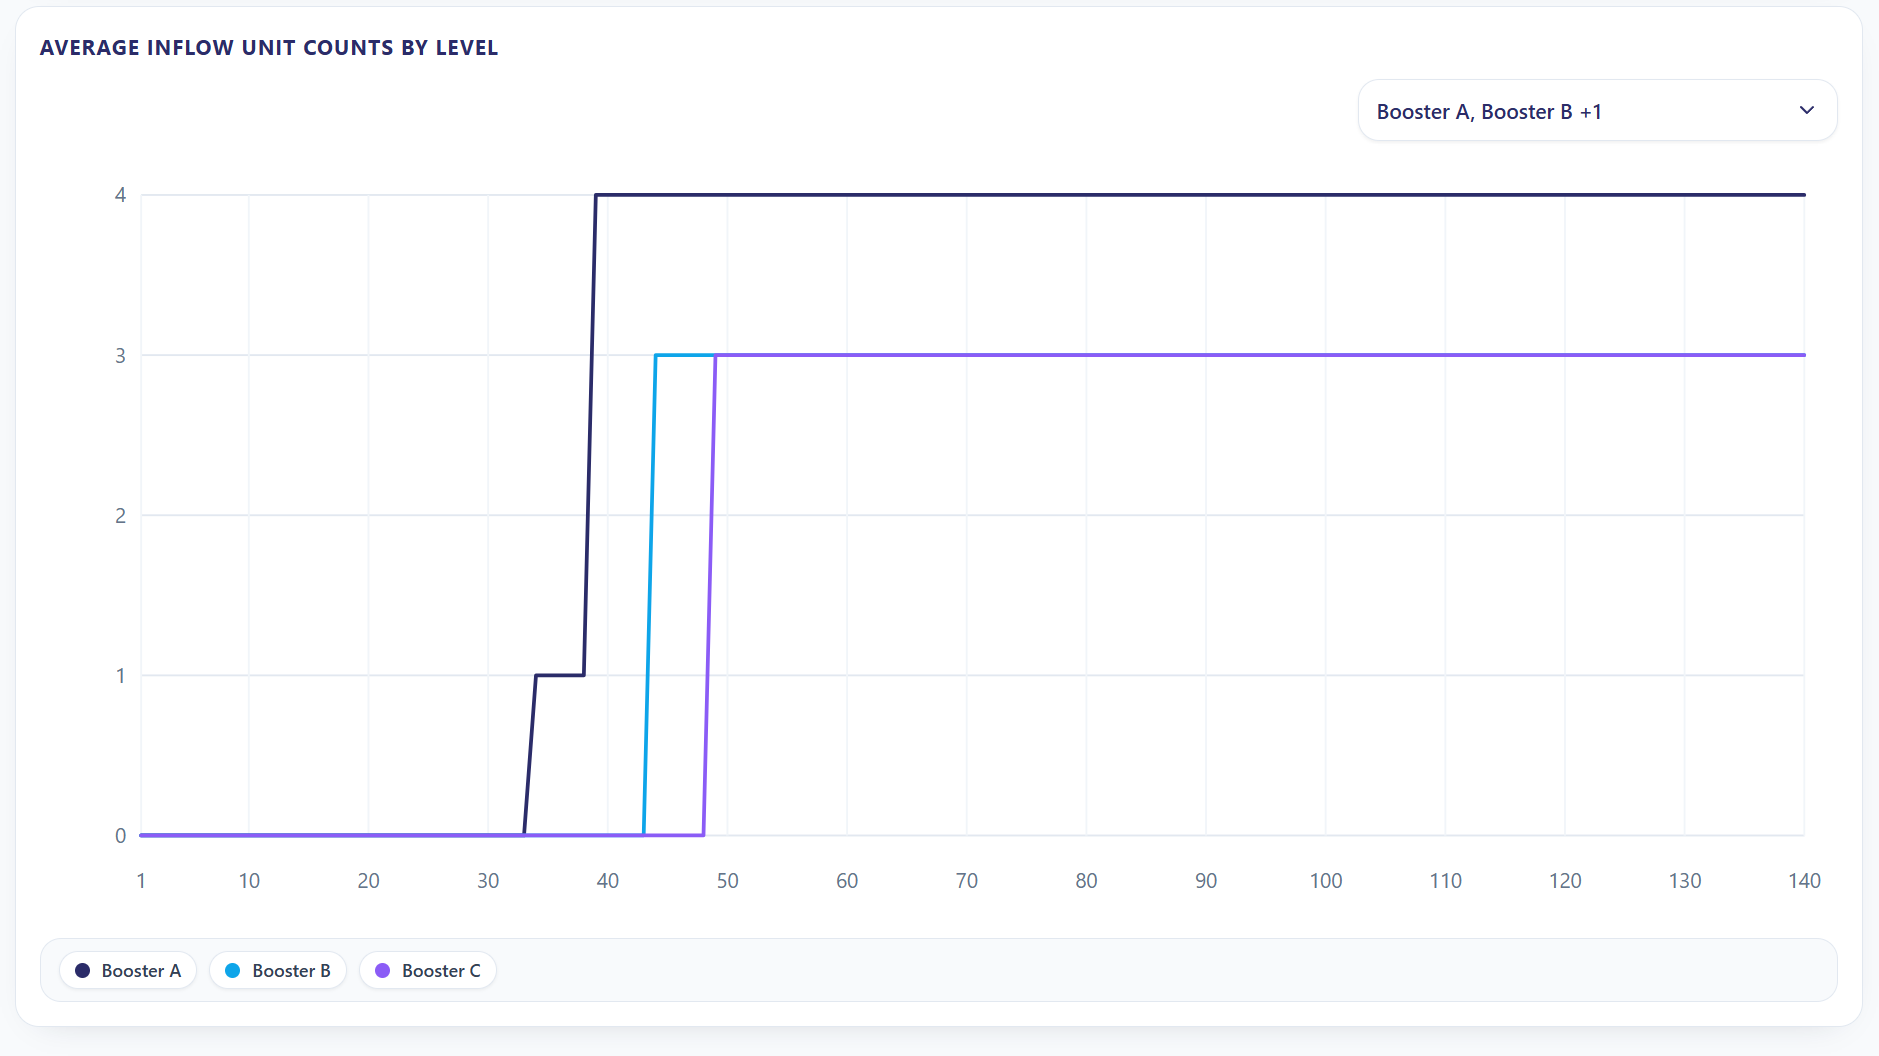
Boosters (A, B and C)
Then, let’s determine which unit we will progress with in the Season Pass:
Level
We should also define a unit for the cost of the event’s premium tier:
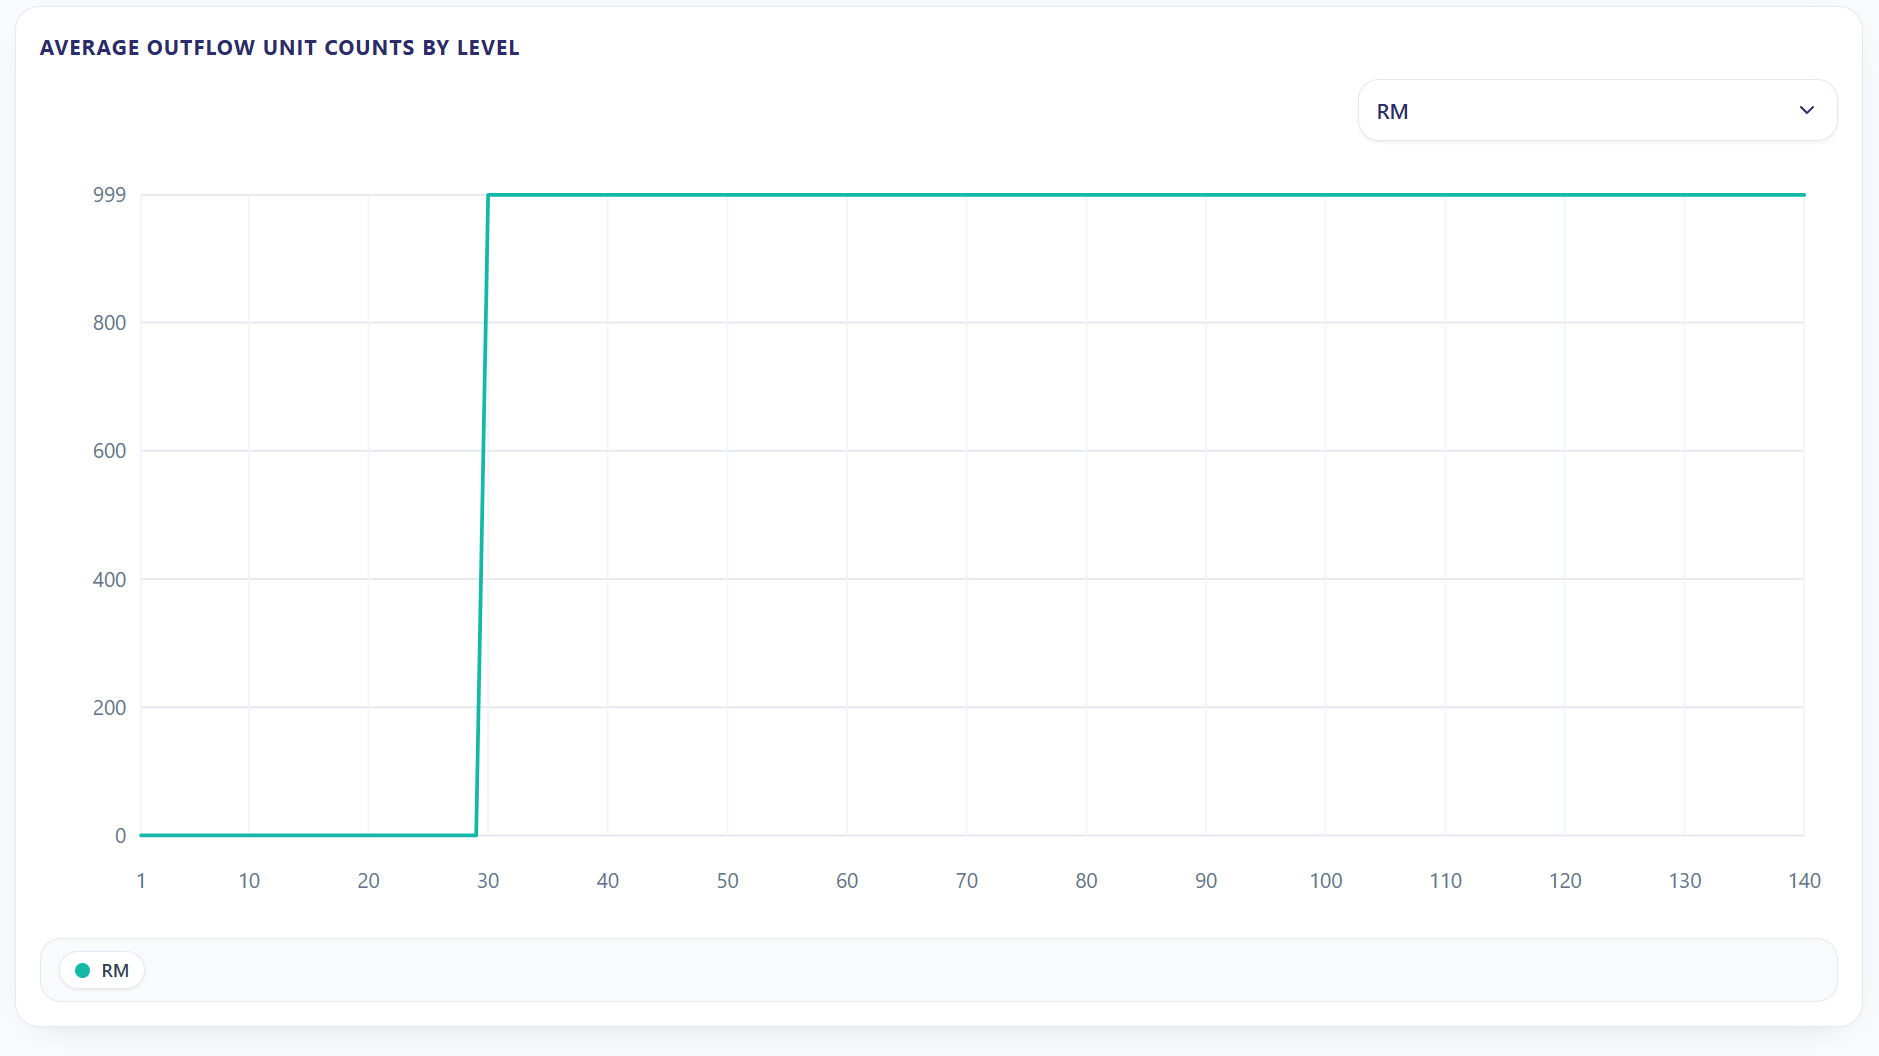
RM (Real Money)
The Unit library should have become something like this:

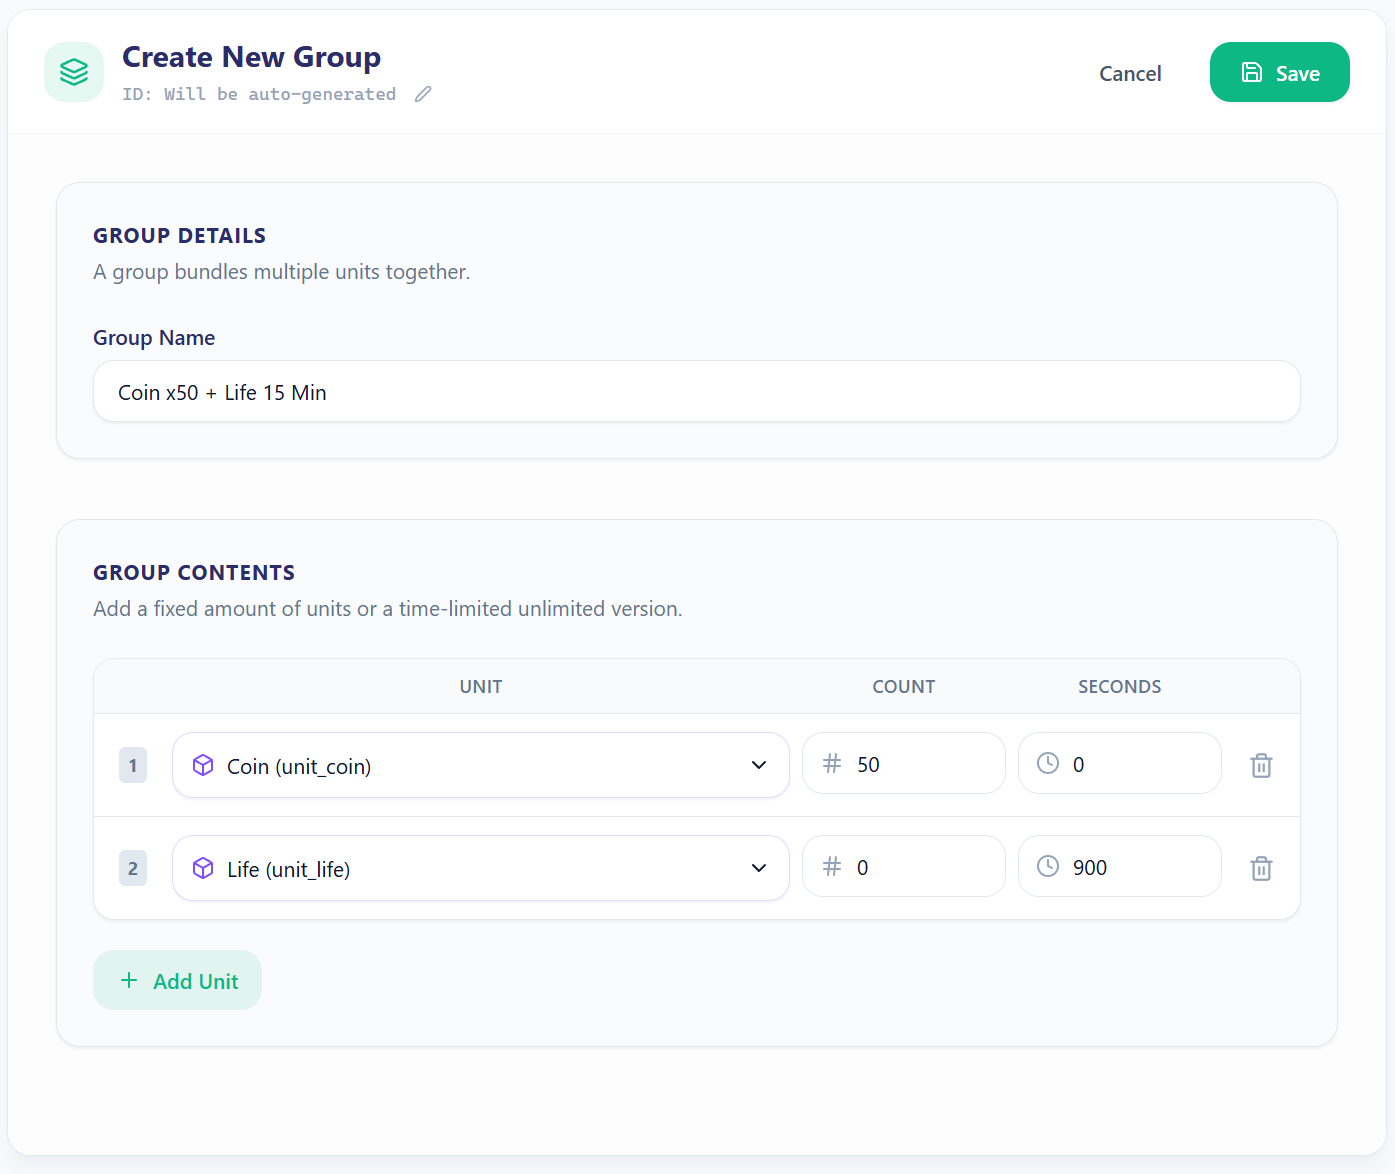
Designing Groups for the Season Pass Event
At this stage, we will group the units to give as rewards in both the free and premium tiers.
Although we haven’t reached the Progression section yet, we need to decide whether the rewards will be distributed in a group-based way. Since the premium tier is purchased only once and its rewards are granted through progression, I’ll use group-based behavior instead of creating separate purchasable packages. We’ll revisit this when designing Progressions.
To keep the article concise, I’ll use five milestones for each tier.
Reward groups for the free tier:
Coin x10
Life 15 Min
Booster A x1
Booster B x1
Booster C x1
Reward groups for the premium tier:
Coin x50 + Life 15 Min
Coin x100 + Booster A x1
Booster A x2 + Life 30 Min
Coin x150 + Booster B x2
Coin x200 + Booster C x2
You can create the groups as shown in the image below:
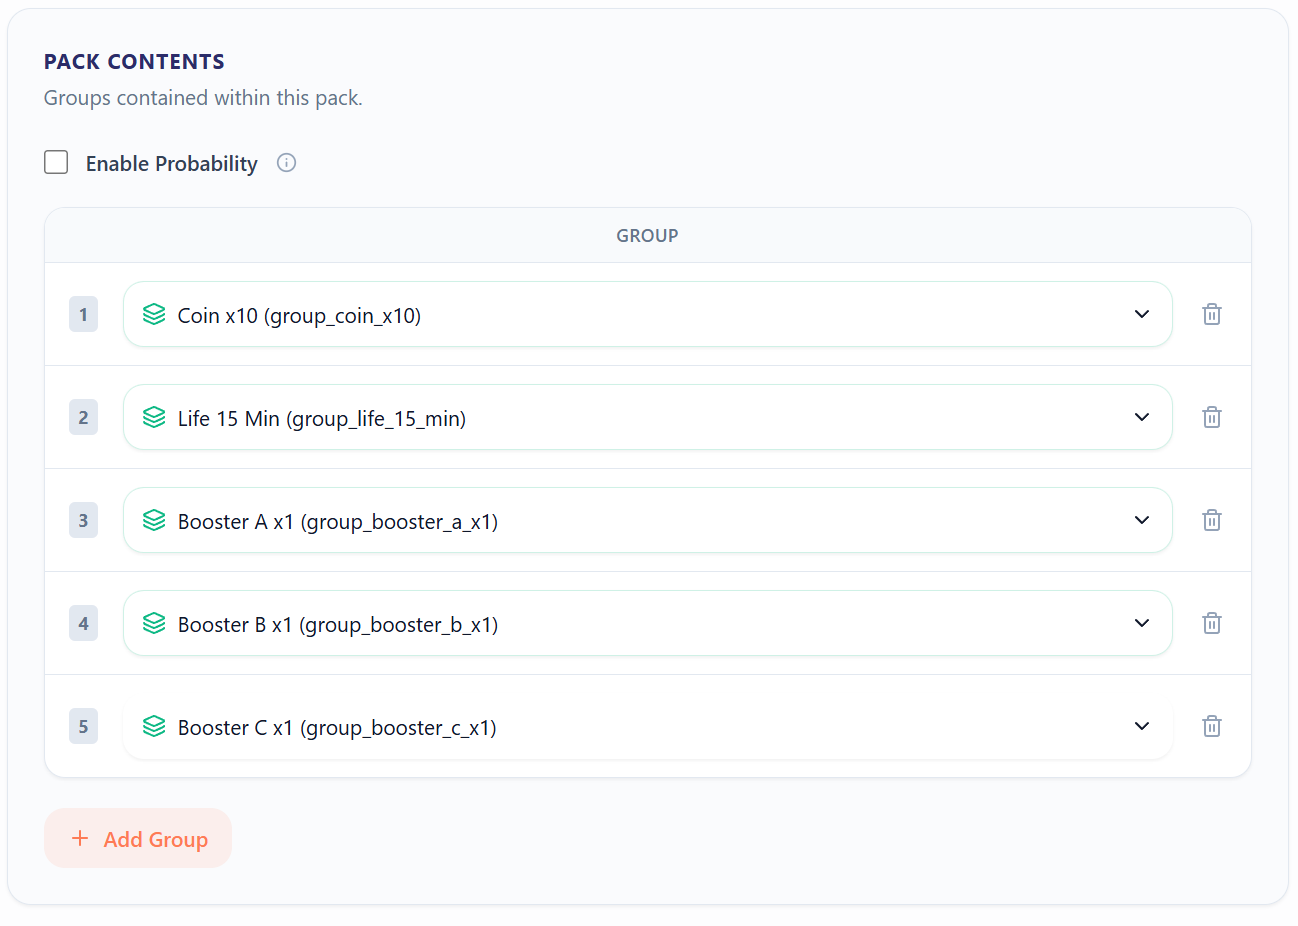
Designing Packs for the Season Pass Event
Here, we will only need 2 packs: one for the free tier and one for the premium tier:
Free Tier Pack
Premium Tier Pack
The packs you add for the free tier should look like this. Since this tier is free, we don’t add any pack cost. And because we’ll be using group-based reward distribution without probability-based rewards, we don’t enable Enable Probability. Even if we did enable it, it wouldn’t take effect because group-based rewards will be active.
For the premium tier, however, we need to define a cost. I’ll set this to RM x999. As a real-world example, we could assume this corresponds to EUR 9.99.
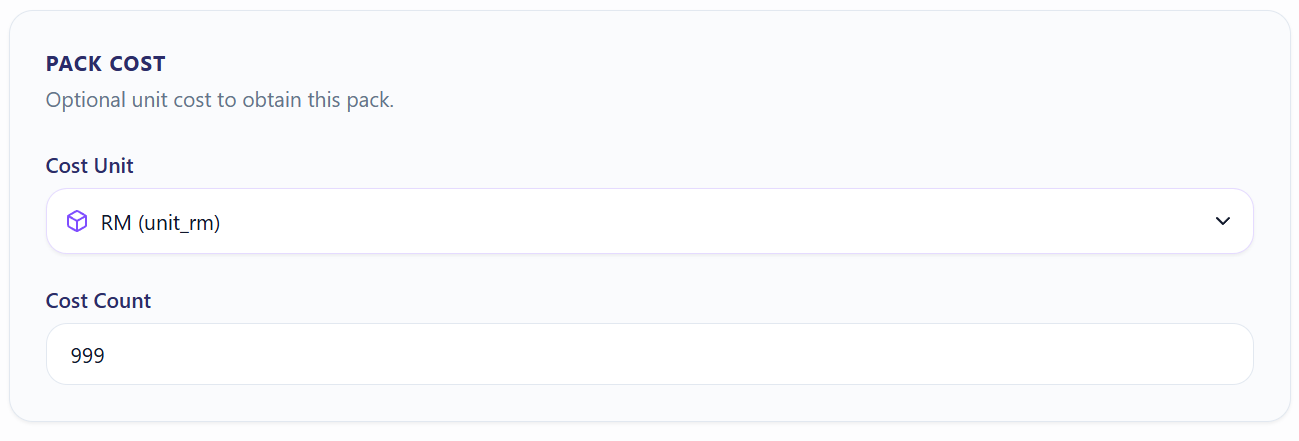
In this scenario, the player cannot access the rewards unless they purchase this pack. One thing to keep in mind is that the economy simulation does not check whether the player has enough resources to purchase a pack.
In the lite version I published, the economy simulator completes purchases with 100% probability. In a more realistic scenario, we would need to use “rule-based” or probabilistic modeling. However, to keep the simulations simpler, I did not include these.
Designing Progressions for the Season Pass Event
We need 2 progressions: one for the free tier and one for the premium tier:
Free Tier Progression
Premium Tier Progression
As we discussed earlier, we will not give the rewards inside each pack all at once; instead, we will give them when each milestone is reached. For this reason, we enable group-based.
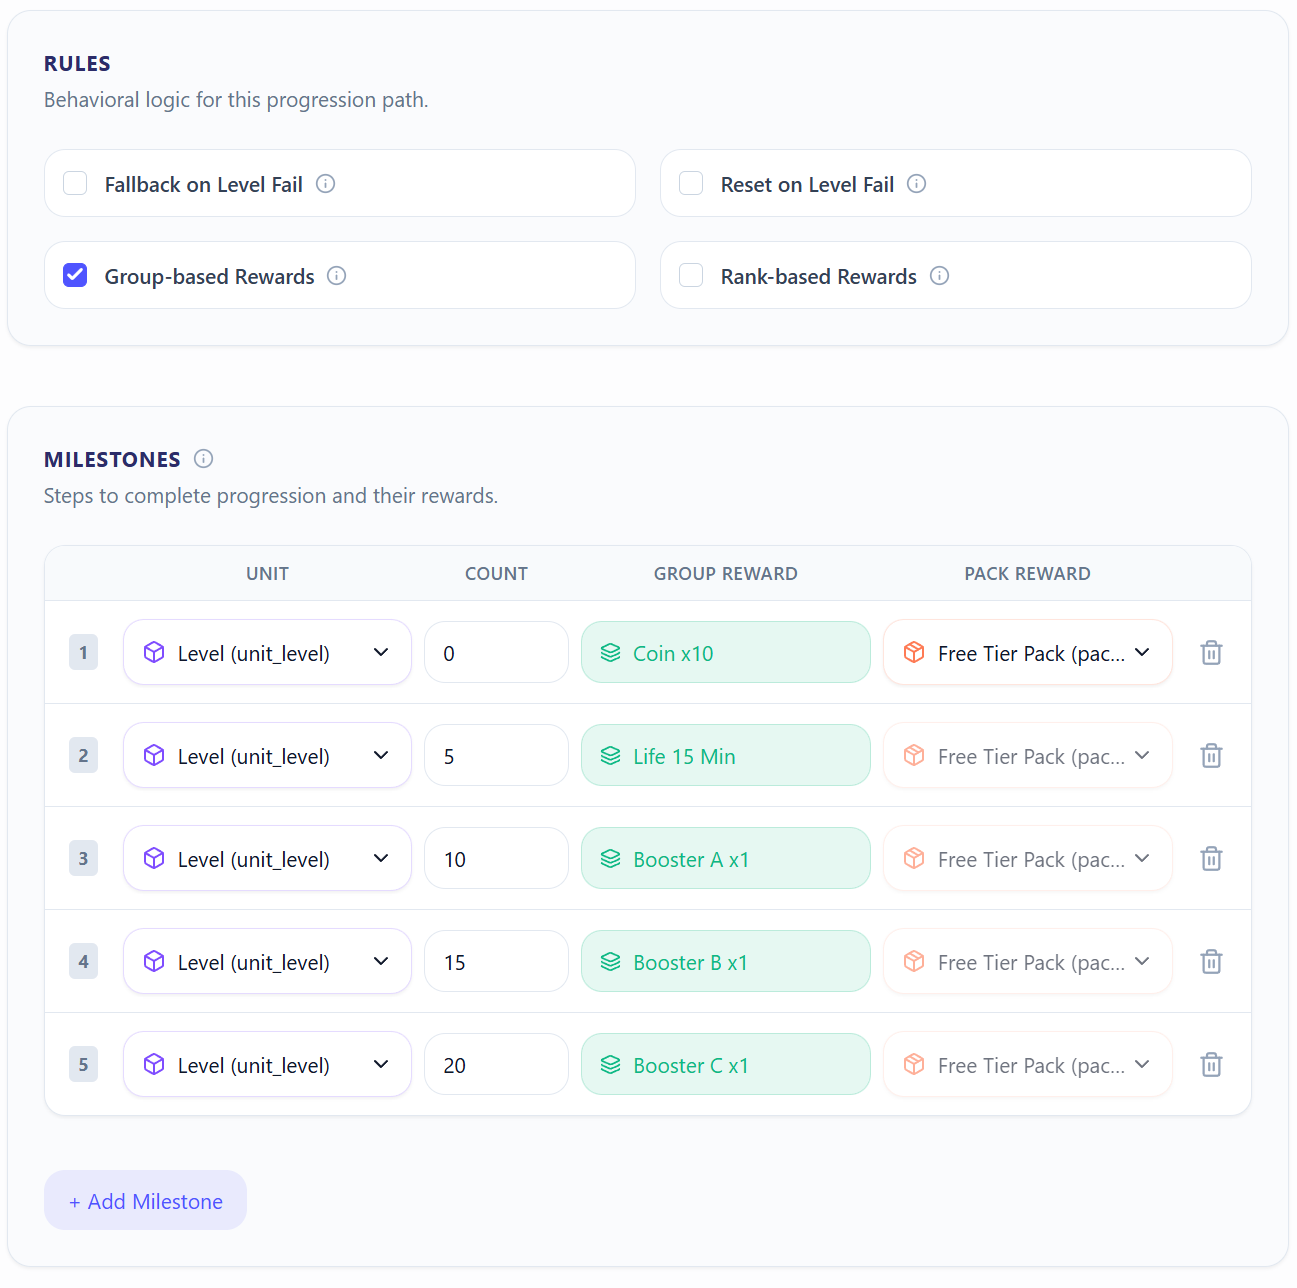
On the other hand, as we will see in the Feature design section, since we want the premium tier to use the same level progression, we will not need to fill in the Unit section.
Designing a Feature for the Season Pass Event
In this section, we connect the progressions inside a feature and create an event:
Season Pass Event
The progressions we added in the previous step should not be independent from each other; they should progress at the same time. For example, if the player purchases the premium tier after making progress in the free tier, they should also be able to collect all premium tier rewards up to the milestone they have currently reached. For this reason, we do not enable independent or serial progressions.
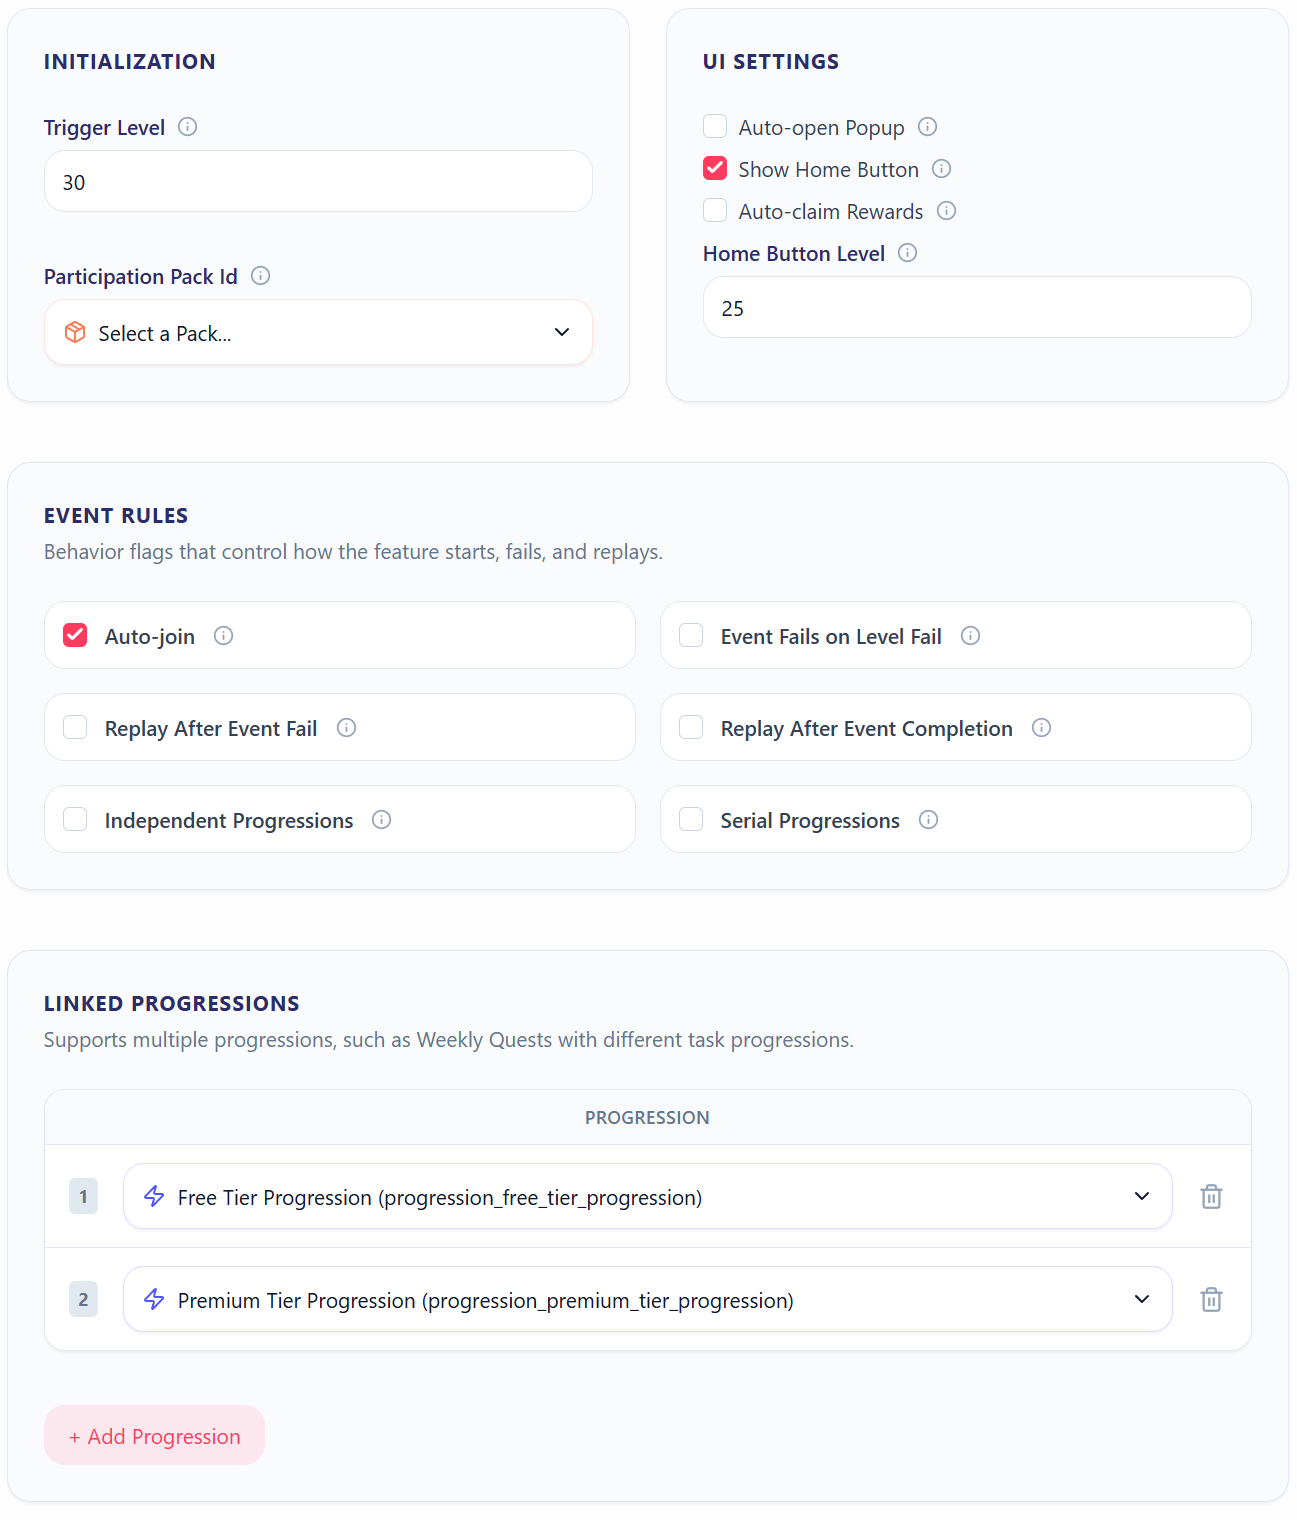
Looking at the options in the image, we want this feature to have a home button, become visible when the player reaches level 25, become active when the player reaches level 30, and automatically join the player to the event. This way, the player can start progressing through the free tier as soon as the event is triggered.
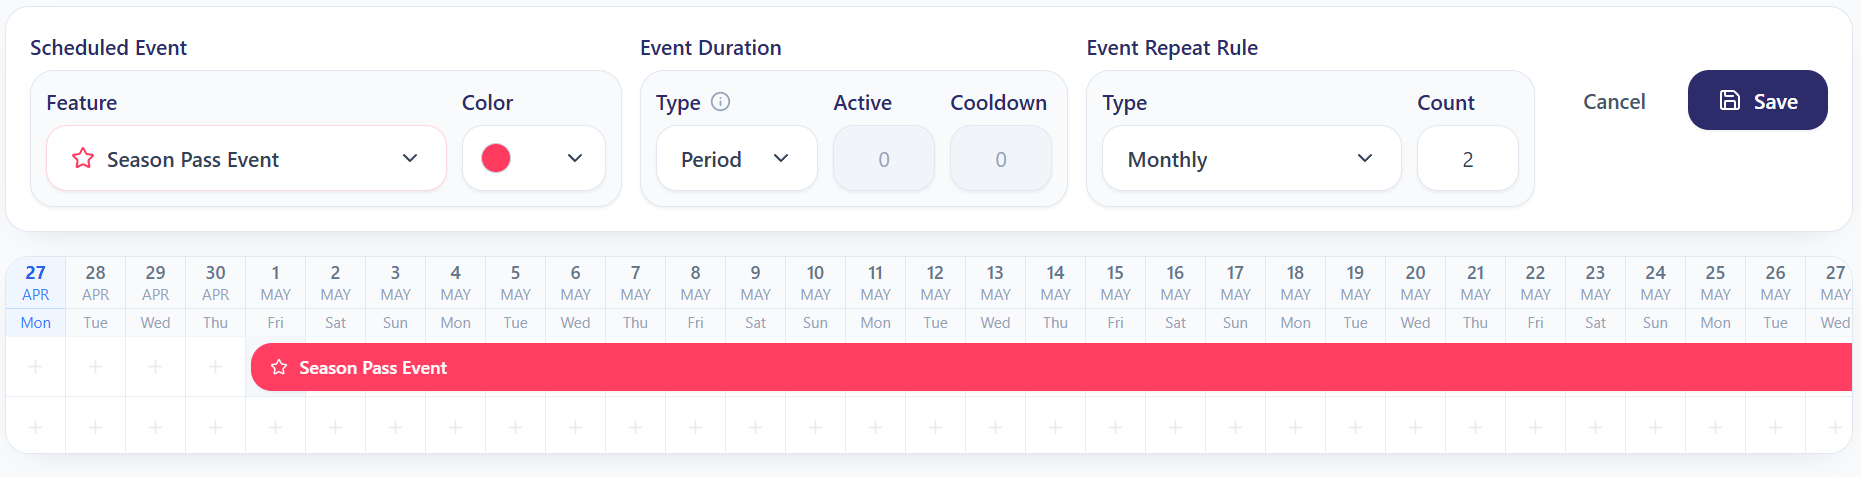
Scheduling the Season Pass Event
Let’s assume we want to schedule this event monthly and have it repeat 3 times in total. In this case, we need to select period as the event duration and monthly as the event repeat rule. Even if we leave the repeat count as 0, the event is still considered active for 1 period.
Simulating Economy of the Season Pass Event
For the Season Pass event, we entered only 5 milestones in total and kept the progression intervals short. For this reason, we have the chance to keep the simulation much shorter. Still, for demonstration purposes, I chose a 7-day period.

You can take a look at the changes in unit amounts in the images below:
Although we did not cover every specification of the framework in this article, I think the system will become clearer in your mind through this example, as well as the examples and documents inside the Sample Segment.
If you have any questions about the framework, feel free to leave them under this post. I’ll be happy to answer whenever I can.
See you in the next article!